Search This Blog

Sunday, March 18, 2012

Soils & Fertilizers for Master Gardeners 2012

David and his assistant, Tre'

David King

Phone number redacted - get it from a fellow class mate if you need it.
Email: learninggardemaster@yahoo.com OR greenman@slola.org. Any email sent to one, also goes to the other. If you send it to both,I will get the email FOUR times. This does not amuse me.

Born in rural Kansas, I grew up about 80 miles from the edge of the Dustbowl about 20 years after it started to rain again. My Grandfather lost his farm in the 30's and became a sharecropper on the land he had once owned for the rest of his working life. I learned to garden at his side. In 1986, I took the Gardening & Horticulture classes at UCLA Extension and have been active in teaching and writing about gardening ever since. I teach UCLA Extension classes now and am the Gardenmaster at The Learning Garden, located on the campus of Venice High School. This is my 7th year teaching soils to Master Gardener trainees. My experience has taught me the value of less fertilizer and more biological activity in the soil as the route to true fertility. 

I can be found on the web at:
www.lagardenblog.com This is the site of my personal blog. I post articles and other writings here, you will quickly see I have no other life. Well, other than a black dog I don't think I'm one dimensional... No... really?

www.beautifulfoodgarden.com Another blog site where you'll find more musings of what we should do to grow food gardens they neighbors will find acceptable to the neighborhood.

www.thelearninggarden.org This is where you will find me, Wednesday through Sunday, 10 AM to 5 PM. I call this my ‘job.’ The up to date calendar and a frequent up dates can be found at www.tlgdaily.blogspot.com.

www.slola.blogspot.com Here is the Record of the Seed Library of Los Angeles (SLOLA), www.slola.org. You can learn why saving seed is important and how to do it. You can join the library and will soon be able to check out your seeds, returning a portion of your crop after you have harvested.


Bibliography

Berry, Wendell, © 2009; The Gift of Good Land: Further Essays Cultural and Agricultural, Counterpoint, Nothing much to do with working the soil, but essays on what it means to till the soil and why it is important. Berry was one of the first to note that all culture begins with agriculture. Anything he has written is thought-provoking and challenges the assumptions of the land and the food we eat from it.

 
Eagen, Timothy, © 2006; The Worst Hard Time: The Untold Story of Those Who Survived the Great American Dust Bowl, Mariner Books Although I was raised very close to the area we know as the Dust Bowl, I, a history buff, no less, didn't realize the awful story of how bad farming practices and greed impacted the entire center of the United States. Sobering but page turning reading.

 
Gershuny, Grace, © 1986; The Soul of Soil; A Guide to Ecological Soil Management, 2nd Edition, Gaia Services Easy to understand, but emphasis is on farming, hence the measurements are in ACRES not square feet making it difficult for gardeners to use. The ecology is sound and the advice understandable. Get on the internet and convert the acres to square feet and you'll have a useful text.

 
Hillel, D. J. © 1992 Out of the Earth: Civilization and the Life of the Soil, Reprint Edition, University of California Press Not a book for application to your garden, but a thorough understanding of the relationship of soil to civilizations including dire warnings for our world today. One of the most passionate and knowledgeable authors writing on soil today, this book is worth every penny and every minute you spend with it. I recommend this above all others. 

 
Logsdon, Gene, © 1975; The Gardener’s Guide to Better Soil, Rodale Press Out of print, but if you find one in garage sale, snatch it up! It is a delightful and easily understood book on soils by one of our best garden authors of the last 50 years. 

Kohnke, Helmut, © 1995; Soil Science Simplified, 4th Edition, Waveland Press For a science text, this is a good, digestible book that explains everything to do with soils with clarity; something really rare in this department. 

Lowenfels, Jeff & Lewis, Wayne, © 2010;Teaming With Microbes, 2nd Edition, Timber Press This is the book that changed my gardening completely. I had begun to suspect that all we knew about fertilizers was slightly skewed towards fertilizers and by the time I finished this book, I was finished with fertilizers too. This book is the cutting edge of what we know about soils and the critters that make our gardens fertile.

 
U S Department of Agriculture, © 1938, Soils and Men: Yearbook of Agriculture 1938, US Department of Agriculture I put this book in to show that I have done my research on this topic – about 200 pages of this thick volume (at the back of the book, mind you) proves that microbial activity was understood enough to make a case against fertilizer in 1938. The other pages of this four pound book describe the use and application of those same fertilizers. Why? America 1938 needed everyone to buy more things; if your soils already have microbes, you won't buy fertilizer.

 
david

Collecting and Drying Local Seed


There are seed pods on this Western Redbud.

Collecting


Make a point of picking only plants growing in prime locations. Individual plants with many insect holes and obvious poor health are probably located at the extremes of their preferred growing conditions and may also have distinctly atypical biochemistries as a response to their compromised growing conditions. Always check around the vicinity after you have located a desired plant.; in fact, it should be stated that the best collector has scouted the area weeks ahead of going to collect seed – this needs to be a thoughtful and deliberative process. However, there may be times when there isn't any 'wiggle' room – in that case, still maintain a considered posture. Remember, a thoughtless collector can wreck havoc on an ecosystem. There may be a whole field of your desired plant over the next rise or around the bend in the road. On the other hand, it may be the only one in the whole valley – and should absolutely be left alone. Furthermore, a plant common in one state may be a rare, protected plant in the next state, so check with a local California Native Plant Chapter first if in doubt.

Certain conservation practices are always necessary. If a plant grows in large stands, never take more than a third of the plants' seed. If it is a large, solitary bush or tree, never pick more than a fourth of the seed.

Wherever you gather, presume that you will come back the next year to the same place and find the plants still healthy. Don’t make a common mistake of looking many days for a plant, finding it at last, and taking a whole load of its seed back with you – it’s like you are punishing the plant (indeed the species!) for your frustration. And most of it, mark my words, will go to waste.

Remember, know a few plants well, know what you will need and don’t try for the record amount of seeds never planted (and in a year, designated 'uncertain germination percentage').

Drying

Dry your seeds promptly upon return. Lay the seed on screens away from direct sunlight in a dry place and, above all, away from rodents and insects. Fear of insects and rodents have spurred me to use my food dryer to do the job as quickly as possible. Dry your seed as promptly as possible and, once dry, place in paper envelopes or in glass jars. Make sure your seed stock is insect free before storing. It can be terribly disconcerting to find your stored seed has become insect larvae feed and you have nothing to show for your work.

david

Thoughts on California Native Plants


Ms Bee visits a California Poppy
Before we begin to think about how to grow California native plants, let's think about why we might want to grow California native plants. The native vegetation, through evolution, is adapted to this climate, these soil types and interacts with other natives (insects, mammals, birds, reptiles) in an ecological dance that was going on long before humans arrived, and certainly before the present civilization of humans arrived on scene. Their niche in the ecology of California gain some advantages to the gardener:

They Save Water
Once established, many native plants need little or no irrigation. Not only does one save the limited amount of water we have available, that saves one money.

Lower Maintenance
Less pruning and no fertilizers means less work for a gardener, saving time to learn more propagation and take more courses at UCLA Extension


Pesticide Freedom
Native plants interact with the insects of their environment in a way that eliminates pesticide use. The pests and diseases evolved with the plants and native plants have their own defense against them. Beneficial insects often become collateral victims when we spray pesticides (even more true if we use organic methods). Stop poisoning ourselves and our world.


Invite Wildlife
Native plants, birds, butterflies, beneficial insects, and interesting critters are, as noted above, co-evolved to be here. Current research shows confirms what many have intuited for many years: native wildlife clearly prefers native plants. California’s wealth of insect pollinators can improve fruit set in your garden, while a variety of native insects and birds will keep your landscape free of mosquitoes and plant-eating insects. Open your garden to these wild living things that live among us, despite what we have done to their habitat.


Support Local Ecology
While creating native landscapes can never replace natural habitats lost to development, planting residential and commercial gardens, parks, and roadsides with California natives can provide a “bridge” to nearby remaining wildlands.


California native plants are a world unto their own, mostly because we have so little familiarity with them. By that I mean, our culture's experience with growing these plants is something like 250 years – many a good deal less, like 60 years. And that is also the time we've been selecting them for our gardens. On the other hand, beans, lettuce, cabbage, onions have been in cultivation for thousands of years. Over that time, civilizations have selected year after year those plants that adapt to our culture, or in the case of stubborn plants, we have figured out how to make that plant grow to suit us. This selection process has yet to occur for California natives. Add to that the fact that these are plants from the driest of the world's Mediteranean climate that have adapted to survive with cool, wet winters and long, hot, droughty summers, in a land ravaged by frequent wildfires and you have plants that are, by nature, not ready to accept the regimen we intend to use to make them grow.

The cycle that California native plants live by is almost perfectly backwards to the cycle by which we want to make them grow. We want to plant in Spring (along with our tomatoes and marigolds) and have flowers blessing our landscape by July, if we insist on this, we will spend much more money on therapy than plants! Plant California natives in fall, when we hope for rain to establish them, and enjoy the fecundity of flowers in March/April. Right now, in the California native garden, some salvias are blooming, I've seen Blue Eyed Grass and some poppies blooming. By mid-March, the scene is breathtaking!

Being essentially wild plants, these plants of our home employ many different mechanisms to ensure that at least some of the seeds will find conditions acceptable to carry on the family name. These mechanisms cause for wacky germination of their seeds that drive gardeners batty and can be imitated by gardeners, if one knows the mechanisms a given plant uses to germinate at the most propitious moment for plant survival include:
germination after a fire
germination after cooler temperatures indicate winter
germination as daylight gets longer, indicating more longer days
germinating over a long period of time to have at least some of them hit ideal growing conditions

Meeting some of these conditions, for a gardener can be difficult. In order to imitate conditions that would break these inhibitors, one must understand the process the seed goes through in order to mimic it. In the case of fire causing germination, is it the heat, the chemical residue left by the fire or both that causes the seed to germinate when there is less competition for natural resources? If it is chemical, the commercially available 'Liquid Smoke' could be added to the container in and initial watering and that might be the key to unlock germination. If it is heat, one will need to start a fire over the seeds to get the heat. For example, in germinating Matilija Poppy (Romneya coulteri) the fire that would burn around these seeds in nature, would be composed of Coast Live Oak (Quercus agrifolia) leaves. When I want to start Matilija Poppy from seed, I cover them with Live Oak leaves and set them on fire. My thought is that the temperature, the chemistry needed for the poppy to sprout will best be approximated by those leaves of the oak with which it can often be found. I might be just a little too fixed on this, but my results of poppy germination have been excellent.

Cold and heat is usually coupled with the word 'stratification,' cold stratification being the most common.


david

Saturday, March 10, 2012

Plant Propagation by Leaf, Cane, and Root Cuttings: Instructions for the Home Gardener

by Katarina Eriksson, Horticulturist. 2012
Guest Instructor, March 11, 2012
 
Types of Media used for propagation: (All equipment cleaned and sterile if possible)
                                                                                
½ sand with ½ good potting soil, or;
½ sand with ½ moistened peat moss, or;
⅓ sand with ⅓  perlite and ⅓  vermiculite, or;
⅓  peat with ⅓ perlite and ⅓ vermiculite.
(The propagation medium should be thoroughly moistened before use. Many organic materials, like peat moss, resists wetting at first (aquaphobic ). Be sure to apply warm water slowly while mixing to obtain uniform distribution. This may require 2-3 applications. It is not uncommon for a medium to look wet on the surface but to be powdery dry in the middle. A well moistened media will make it easier to stick cuttings later on.)

LEAF CUTTINGS
Some, but not all, plants can be propagated from just a leaf or a section of a leaf. Leaf cuttings of most plants will not generate a new plant; they usually produce only a few roots or just decay. Because leaf cuttings do not include an axillary bud, they can be used only for plants that are capable of forming adventitious buds (axillary bud refers to structures that develop in an unusual place). Leaf cuttings are used almost exclusively for propagating some indoor plants and succulent . There are several types of leaf cuttings:

Leaf-petiole
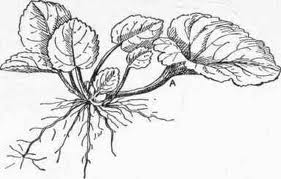
Remove a leaf and include up to 1 1/2 inches of the petiole (The stalk attaching the leaf blade to the stem). Insert the lower end of the petiole into the thoroughly moistened medium (Figure 1). One or more new plants will form at the base of the petiole. The new plants are then severed from the original leaf-petiole cutting. Examples of plants that can be propagated by leaf-petiole cuttings include: African violet, begonia - rhizome types, Christmas cactus, gloxinias, hoya, peperomia, rubber plant, and sedums.  
1. With a clean sharp knife, remove a healthy leaf and at least 1 ½ inches of the petiole or leaf stem.
2. Hold the leaf gently and dip the cut end of the petiole into a rooting hormone.
3. Insert the petiole of the leaf into an appropriate medium at a 45 degree angle. Since new plants develop at the base of the leaf it is important that the leaf does not shade the new plants.
4. Increase the humidity around the cuttings. For a single pot use a clear plastic bag propped up with pencils. When using a standard black seedling tray, a clear plastic humidity dome works well. Bottom heat of about 75 degrees F should be provided if possible. Also recycled food plastic boxes.
5. Once the new plants have formed, (Figure 1) in approximately 8 weeks, carefully separate each new plant from the parent . Avoid damaging the delicate roots. It is these new plantlets which form around the stem which are used to transplant. The old leaf can be discarded or composted. Sometimes is a mass of clusters of plantlets.
6. Transplant each new plant into a 2 ½ -3 inch pot, using a lightweight potting soil and water thoroughly. Then pot up each stage to the size you want.
 
Figure 1.

Leaf without a petiole
This method is used for plants with thick, fleshy leaves. The snake plant (Sansevieria), a monocot, (Monocot seedlings typically have one cotyledon seed-leaf, like a blade of grass) can be propagated by cutting the long leaves into 3- to 4-inch pieces. Insert the cuttings vertically into the medium.
African violet, is a dicot, (a group of flowering plants whose seed typically has two embryonic leaves or cotyledons as seedlings.) can also be propagated from the leaf blade itself. Cut a leaf from a plant and remove the petiole. Dip in hormone, Insert the leaf vertically into the medium making sure that the midvein is buried in the rooting medium (Figure 2). New plant(s) will form from the midvein. Remember...if cuttings are stuck upside down they will not root. Leaf cuttings can be literally crowded together, almost shoulder to shoulder. This crowding will not harm them, and once the root systems have been developed they can be separated for transplanting into individual pots.
Other plants: Aloes, Cactus (particularly varieties producing "pads" like Bunnies Ears), Crassula (Jade Plant), Kalanchoe, Peperomia, Plectranthus (Swedish Ivy), Sedum and many other succulents.
 Figure 2.  Take a healthy leaf. Cut the leaf into sections, each with a main vein.

Split-vein and leaf wedge
Detach a leaf from a rex begonia and remove the petiole. Make cuts on several prominent veins on the underside of the leaf (Figure 3). Lay the cutting, lower side down, on the medium. If the leaf curls up, hold it in place by covering the margins with rooting medium or staples. New plants will form at each cut. A variation of this method is to cut the leaf into wedges, (Figure 3b) so that each piece has a main vein. The leaf wedge should be inserted into the media with the main vein partially covered. (I prefer this method)
 
Figure 3.  Slit leaf cuts and (2) new plantlets forming
 
Figure 3b. Wedge cuts

Leaf-bud Cuttings
Leaf-bud cuttings are used for many trailing vines and when space or cutting material is limited. Each node on a stem can be treated as a cutting. This type of cutting consists of a leaf blade, petiole, and a short piece of stem with an attached axillary bud. Place cuttings in the medium with the bud covered (1/2 to 1 inch) and the leaf exposed (Figure 4). Examples of plants that can be propagated in this manner include: clematis, rhododendron, camellia, jade plant, rubber plant, devil’s ivy, grape ivy, dracaena, blackberry, mahonia, and heart-leaf philodendron, English Ivy, pothos, Pelargoniums-Geraniums. Plant material selected for leaf cuttings should be
healthy, actively growing and free of insect or disease problems. Large, mature leaves provide the best source of propagation material.
Figure 4. The stem portion produces roots, and a new shoot develops from the bud
(Notes: Many plants will easily root in water. However, the roots that form can be extremely fibrous and stringy. Plants rooted in water often have a difficult time becoming established after they are transplanted to a container.)

CARE:
Moisture:
The propagation medium should be thoroughly moistened before use. Many organic materials, like peat moss, have a waxy outer coating that resists wetting. Be sure to apply water slowly to obtain uniform distribution. This may require 2-3 applications. It is not uncommon for a medium to look wet on the surface but to be powdery dry in the middle. A well moistened media will make it easier to stick cuttings later on.
Light:
Light is an important environmental factor in plant propagation. Generally speaking, low light levels cause plants to root slowly. However, high light intensities can stress cuttings, causing them to burn or drop leaves. Diffused sunlight generally provides enough light for optimum rooting without causing injury to the cuttings.
Humidity:
Since cuttings do not have roots, they cannot replace the water lost through transpiration. Therefore it is important to maintain high humidity around the cuttings to cut down on the amount of moisture lost to the atmosphere.
These conditions can be provided by placing a clear piece of plastic over the propagation area. This causes condensation to form on the underside of the plastic that provides the necessary humidity. Adequate ventilation is also required to avoid disease problems. The plastic covering should be placed such that air can flow freely around the cuttings as they root. Also you can recycle plastic food containers (Good for the Earth)
Temperature:
For best results, maintain day temperatures at 70 degrees F. During winter months, soil can be as much as 10-20 degrees less than air temperature, so provide bottom heat when possible. Ideal rootzone temperatures for most plants are approximately 70-75 degrees F.
Rooting Hormones:
Rooting hormones are often used to promote root formation. These materials provide supplemental auxin, a naturally occurring plant hormone that is responsible for root development. The basal end of the cutting is dipped into the chemical prior to sticking it into the propagation medium. These products come in different strengths and will vary according to the type of plant being propagated.

ON ROOTING HORMONES
Auxin, a naturally occurring plant hormone, stimulates root formation.
Several synthetic forms of auxin are sold as "rooting hormone." Though some plants will root readily without treatment, application of rooting hormone to the base of the cutting will often improve your chance for success.
Two synthetic auxins, IBA (indolebutyric acid) and NAA (naphthaleneacetic acid) are most frequently used. They are available in several concentrations and in both liquid and powder form. 1,000 ppm (0.1%) is used most often for herbaceous and softwood cuttings; 3,000 ppm (0.3%) and 8,000 ppm (0.8%) are used for semi-hardwood and hardwood cuttings. Liquid formulations can be used at low or high concentration for softwood or hardwood cuttings, respectively. To determine the appropriate concentration for your cutting, follow the instructions on the product label and the general guidelines just given, or consult the references listed at the end of this publication.
IMPORTANT: To use rooting hormone, place the amount needed in a separate container. Any material that remains after treating the cuttings should be discarded, not returned to the original container. These precautions will prevent contamination of the entire bottle of rooting hormone.

Home made organic rooting hormone

MAKE ROOTING HORMONE WITH WILLOW WATER! 
The active ingredient of many commercial rooting products is Indolebutyric Acid (IBA), a natural plant hormone and and Salicylic acid (SA) (which is a chemical similar to the headache medicine Aspirin) is a plant hormone which is involved in signalling a plant’s defences. When you make willow water, both salicylic acid and IBA leach into the water, and both have a beneficial effect when used for the propagation of cuttings. One of the biggest threats to newly propagated cuttings is infection by bacteria and fungi. Salicylic acid helps plants to fight off infection, and can thus give cuttings a better chance of survival. Plants, when attacked by infectious agents, often do not produce salicylic acid quickly enough to defend themselves, so providing the acid in water can be particularly beneficial. (Do not use Aspirin, too many other chemicals, not organic)
  1. Get a handful of willow twigs (any Salix species will do) Collect young first-year twigs and stems of any of willow (Salix spp.) species, these have green or yellow bark. Don’t use the older growth that has brown or gray bark. Remove all the leaves, these are not used.
  2. Take the twigs and cut them up into short pieces around 1" (2.5cm) long.
  3. The next step is to add the water. there are several techniques to extract the natural plant rooting hormones:  a) Place the chopped willow twigs in a container and cover with boiling water, just like making tea, and allow the “tea” to stand overnight.                           b) Place the chopped willow twigs in a container and cover with tap water (unheated), and let it soak for several days.
  4. When finished, separate the liquid from the twigs by carefully pouring out the liquid, or pouring it through a strainer or sieve. The liquid is now ready to use for rooting cuttings. You can keep the liquid for up to two months if you put it in a jar with a tight fitting lid and keep the liquid in the refrigerator. Remember to label the jar so you remember what it is, and write down the date you brewed it up, and to aid the memory, write down the date that it should be used by, which is two months from the date it was made! You can also freeze it.
  5. To use, just pour some willow water into a small jar, and place the cuttings in there like flowers in a vase, and leave them there to soak overnight for several hours so that they take up the plant rooting hormone. Then prepare them as you would when propagating any other cuttings.
  6. Now remember since this method isn't very exact, the strength of the willow water can vary depending on the time of year, the number of twigs, the concentration of hormones in the twigs, and the amount of time that the twigs were soaked. You will, however, still get a solution that will help your plants root.

Contents of this site, text and photography, are copyrighted 2009 through 2017 by David King - permission to use must be requested and given in writing.